 Plant
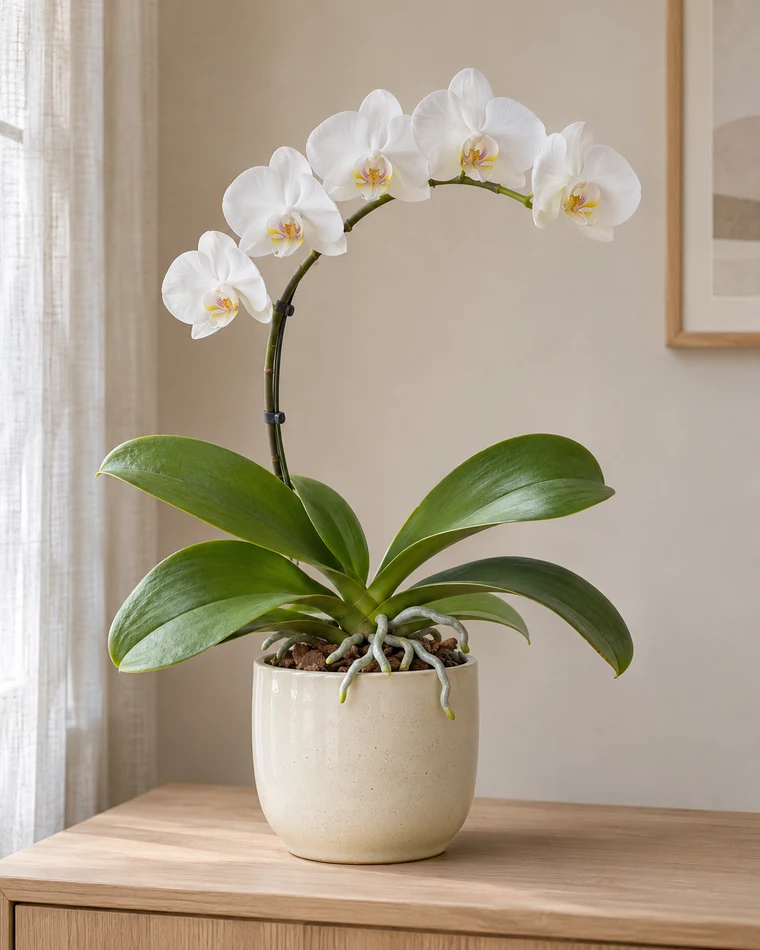
Moth orchid.
Phalaenopsis
A moth orchid can live well beyond its first display of flowers. The secret is understanding its roots: most indoor Phalaenopsis hybrids need air around them, thorough drainage and moisture checks before watering. This guide covers familiar shop-bought hybrids, explains how to interpret common problems, and helps you decide what to change without disturbing a healthy plant unnecessarily.
How to help it thrive.
Checked:
Quick care reference
- Provide bright filtered light; acclimate to stronger exposure.
- Check the medium and pot weight before watering.
- Wet the medium, drain fully and empty the decorative pot.
- Keep the crown above the medium and free of standing water.
- Use airy orchid medium and a suitably sized drainage pot.
- Keep common hybrids warm, with nights generally around 16–19°C.
- Inspect leaf joints, spikes and roots during routine care.
- Feed according to the product label during active growth.
- Keep firm aerial roots and remove only clearly dead tissue.
- Record repotting, environmental changes and new growth.
Meet the moth orchid
Phalaenopsis is a genus in the orchid family, Orchidaceae, rather than the name of one species. Its natural range extends through tropical and subtropical Asia to northeastern Australia. Many members grow on trees as epiphytes; their roots attach to a support without taking food from the tree. Most moth orchids sold for homes are cultivated hybrids with several species in their ancestry.
A typical plant has a short central stem, a few broad evergreen leaves and arching flower spikes. Miniature and standard hybrids differ greatly in spread and spike length, so the nursery label is more useful than a single universal mature-size figure. Leave space for both the leaves and the flowering stems. A healthy orchid is a perennial that can remain in a collection for many years; the end of flowering is not the end of its life.
This profile addresses ordinary warm-growing indoor hybrids. A named botanical species may need different seasonal conditions. Keep its full label and consult species-specific advice before applying a generic cooling or drying treatment.
[2][1]Leaves, roots and flower spikes
Look for thick, smooth leaves arranged on opposite sides of a short central stem. The flowers have a distinctive central lip and a broad, roughly moth-like outline, but their colour alone does not identify a species or cultivar. A plant sold without a cultivar label should remain an unnamed hybrid rather than being assigned a name from a photograph.
Exposed roots are normal. Their outer covering can look silvery when dry and greener after wetting; roots hidden from light may be pale without being dead. Judge firmness and condition as well as colour. A growing root normally has a rounded tip, whereas a developing flower spike is more flattened and carries nodes. Avoid poking at either to identify it.
Dendrobium orchids often have conspicuous canes, and many other popular orchids have swollen storage stems. Moth orchids lack these pseudobulbs, which helps explain why prolonged complete drying is risky. Distinguish the flower spike from the leafy central stem before pruning: cutting the growing crown is not a routine way to encourage branching.
[1]Bright light without scorching
Choose bright filtered daylight. An east-facing window is often a useful starting point; in a stronger exposure, a sheer curtain or a position farther from the glass can soften direct sun. Window direction is only a clue: hemisphere, trees, glazing and season alter the actual exposure. Watch the plant at the hottest part of the day before deciding that a spot is safe.
Insufficient light may allow survival without reliable flowering. Scorched areas can become pale and then dry brown, especially after a sudden move into strong sun. These signs are not exclusive diagnoses, so compare the damaged area with the direction of the light and check roots and watering too. Acclimate a plant gradually rather than changing several conditions at once.
A full-spectrum grow light can supplement a dim room. Follow the fixture maker’s distance and duration guidance and use a timer with a daily dark period. Do not copy a distance from an unrelated lamp: power and optics differ. Keep leaves away from hot fittings and check whether the added light changes how quickly the pot dries.
[1][6]Water the roots, then let the pot drain
Check the medium and the pot before watering. Lift the pot to learn its weight after draining and as it approaches dryness; inspect visible roots and condensation if the pot is transparent. Water when the medium is approaching dry but before the whole root system remains dry for a prolonged period. A silvery aerial root alone does not prove that the centre of the pot needs water.
Use room-temperature water to wet the medium thoroughly, then let excess water escape. Empty the outer decorative pot or saucer before returning the plant. Keep water out of the central crown and leaf joints; if water collects there, carefully blot it away. Watering early in the day gives accidental splashes time to dry. Do not leave the plant standing in a reservoir unless it is intentionally grown in a managed specialist system.
Bark generally dries faster than densely packed moss, but pot size, root health, warmth and airflow all matter. A hidden nursery plug can stay wet after surrounding bark looks dry. Investigate persistently uneven drying at repotting, rather than pulling apart a healthy flowering plant simply because a plug might be present. Use a reminder to check moisture, not an instruction to add a fixed quantity every week.
Ordinary suitable tap water can work, but salt-softened water and accumulated minerals can cause problems. Where water is very mineral-rich, consider a suitable lower-mineral source. Periodically rinse the medium with plain water and drain well. An orchid with wrinkled leaves needs a root check: damaged roots cannot supply water even when the pot is wet.
[1][6]Orchid medium, pots and repotting
Use an airy orchid medium such as a suitable bark-based mix. Ordinary dense potting soil can keep these epiphytic roots too wet and poorly aerated. Moss can also be used successfully, but its moisture behaviour is different; packed moss requires particularly careful checks. Choose a medium you can monitor consistently rather than changing recipes repeatedly.
A pot with free drainage is essential. A transparent nursery pot helps you inspect roots and moisture, but transparency is a convenience rather than a requirement. Choose a size that accommodates the living root system without a large volume of unused wet medium. An orchid with fewer healthy roots may need a smaller pot, even if the leaves are large.
Repot when the medium breaks down, drains poorly or no longer suits the roots; this is often around every two years depending on the material and conditions. After flowering is convenient, but serious root deterioration may need earlier attention. Ease away old medium, keep firm roots and remove only clearly dead or rotten tissue with clean tools. Keep the crown above the medium and avoid forcing stiff aerial roots into the pot.
Record the new medium and repotting date. Adjust watering to its actual drying pattern. This practical record is usually more useful for a beginner than chasing an unverified universal pH target or adding household chemicals to change the pot’s chemistry.
[1][6][5]Warmth, humidity and moving air
For common indoor hybrids, a practical starting point is roughly 19–29°C during the day, with nights around 16–19°C. These are care targets, not hard biological boundaries for every cultivar. Keep the plant away from cold glass, heating vents and abrupt draughts. Temperature at the leaf can differ from a thermostat across the room.
Moderate humidity with gentle air movement is useful. If indoor air is very dry, a properly maintained room humidifier can be more consistent than occasional leaf misting. Do not enclose an established plant in stagnant, constantly wet air. Humidity does not replace watering, and a humid room does not make standing water around roots safe.
When changing humidity or moving the plant, monitor the pot again. More airflow may speed drying; cooler conditions may slow it. Buds can react to sudden environmental changes, so a stable bright location is preferable to repeatedly moving a flowering orchid between a display table and a growing window.
[1][6]Feed lightly when the plant is growing
Use a fertilizer suitable for orchids and follow its dilution instructions for the chosen medium and application frequency. A lightly fed, actively growing plant is a better goal than an aggressive feeding schedule. Do not apply concentrated fertilizer to dry or damaged roots, and do not try to correct every yellow leaf with extra nutrients.
Reduce feeding when growth is slow or when the plant is recovering from root loss. Plain-water rinsing helps limit salt buildup, but the rinse must drain away. White deposits, damaged root tips or leaf-edge injury can have several causes; review water quality and fertilizer concentration before adding another product.
A product marketed as a bloom booster cannot compensate for inadequate light, poor roots or unsuitable temperatures. Keep a simple record of what was applied and at what dilution. If you change brands, read the new label rather than reusing the previous product’s spoonful or capful measurement.
[1][6]Healthy growth, cleaning and pruning
New leaves emerge from the central crown and roots extend as conditions permit. Growth is not always fast or visually dramatic between flowering periods. Compare photographs taken weeks apart rather than disturbing roots to look for progress. Old lower leaves may eventually yellow, but rapid loss of several leaves deserves investigation.
Support a long flower spike loosely with a smooth stake and clips that do not pinch it. Keep the stake away from visible roots when inserting it. Wipe dusty leaves gently with a damp soft cloth while supporting them; avoid leaf-shine products and water left in leaf joints.
A fully brown, dry flower spike can be removed with clean tools. A green spike may flower again in some hybrids, while removing it can let a weak plant focus on recovery. There is no need to cut healthy leaves or aerial roots for tidiness. If pruning diseased tissue, clean tools between plants and keep the affected orchid separate.
[1]Propagating an established keiki
The practical home method is occasionally separating a keiki: a small plantlet that develops on a flower spike. Not every orchid produces one. A loose leaf or a piece of ordinary root is not a reliable home cutting, and sowing orchid seed usually requires specialist conditions. Do not cut apart the single central crown as if it were a clumping houseplant.
Wait until the keiki has several leaves and well-developed roots of its own. Judge its readiness by healthy root growth rather than a fixed leaf count or root length. Prepare a small drainage pot and suitable orchid medium before separating it.
With a clean cutting tool, separate the plantlet from its supporting spike while preserving its roots. Set it in the medium with its crown above the surface, and provide warm filtered light and careful moisture checks. Avoid oversized pots, buried crowns and repeated disturbance to see whether rooting has happened. Growth is variable, so no fixed success date is promised.
A basal offshoot crowded beside the mother plant is more complicated than an accessible spike keiki. Leave it attached if separating it would damage the main stem or shared roots. Hormonal keiki paste is not needed for ordinary care and does not guarantee a strong plantlet.
[1]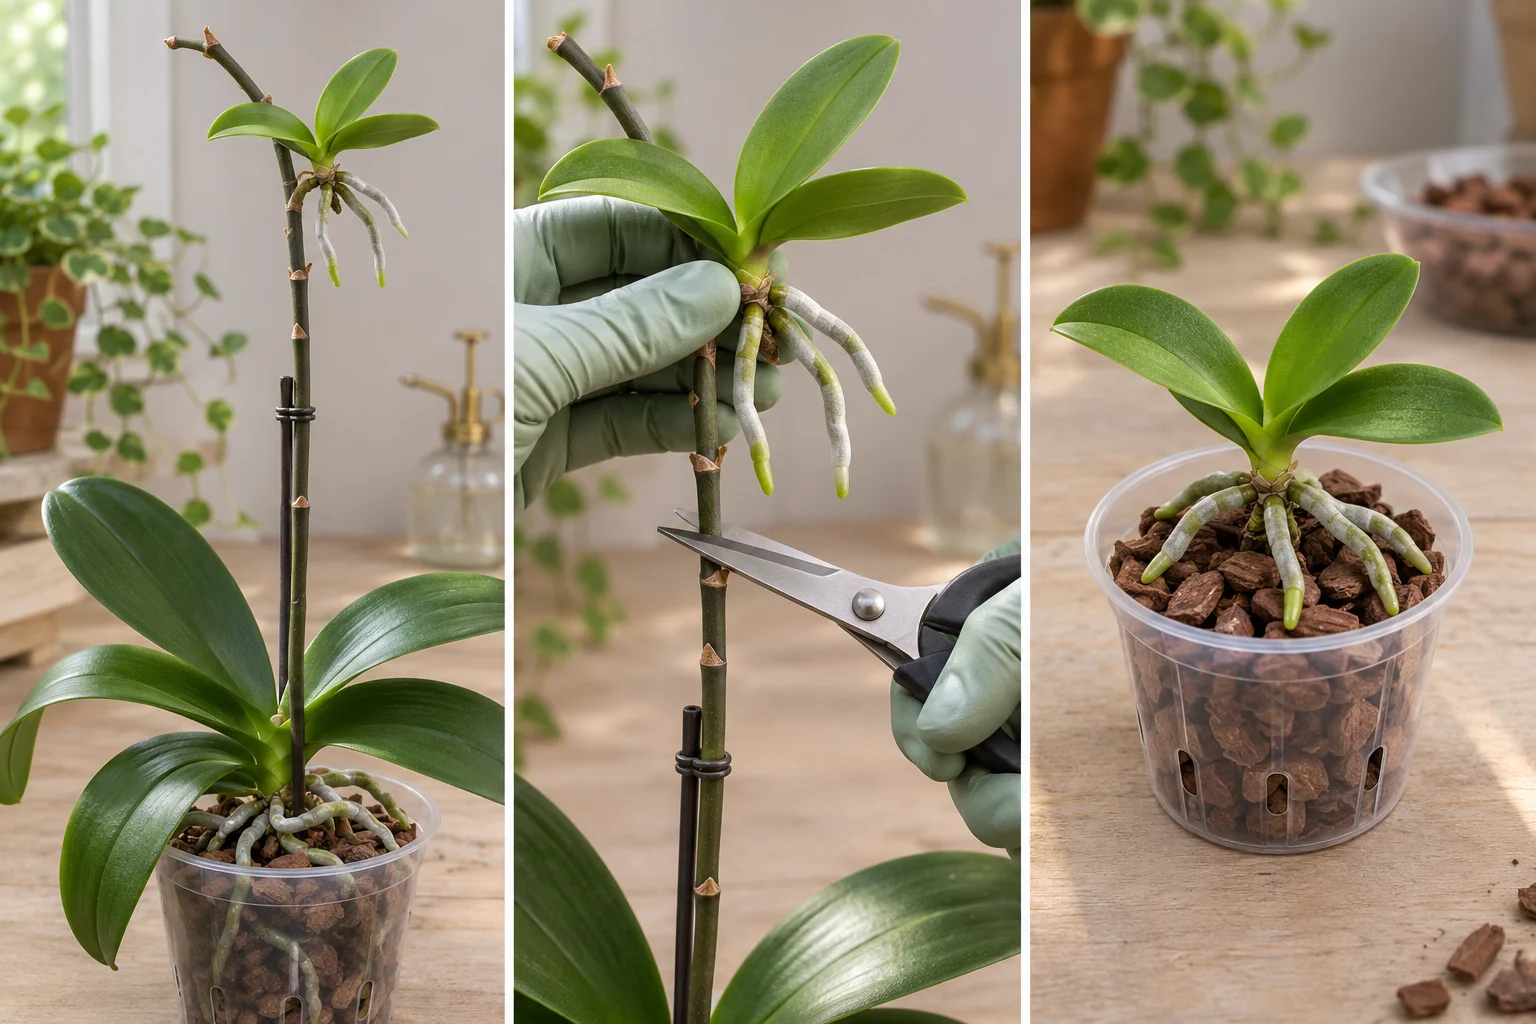
Panels, from left to right
- Wait for a spike keiki with several leaves and established roots of its own.
- Use a clean tool to separate it from the spike while preserving its roots.
- Pot in a small drainage container with orchid medium; leave the crown above the surface.
Pests, root decline and spreading rot
Inspect new orchids before placing them beside an established collection, and keep them separate while you watch for pests. Check leaf undersides, flower spikes, joints and pot rims. Mealybugs can leave cottony material, scale can resemble small attached bumps, and mites can cause stippling or fine webbing. These visual clues need closer inspection; dirt, mineral residue and natural markings can be mistaken for pests.
Isolate a suspect plant and confirm the pest before choosing treatment. A small visible population may be removed carefully by hand, followed by repeated inspections. If a pesticide is needed, use a product specifically permitted for that pest, plant and indoor setting in your location. Follow the label, protect people and pets, and test plant tolerance where the label permits. Avoid improvised household mixtures and routine preventative spraying.
Soft, collapsing roots and a persistently wet medium suggest root deterioration, but a photograph cannot identify the pathogen. Spreading wet lesions, a collapsing crown or rapid decline need prompt isolation and advice from a qualified local horticultural service or orchid specialist. Keep tools clean and avoid sharing runoff between plants. Some badly affected plants cannot be saved safely within a collection.
[3][1][6][5]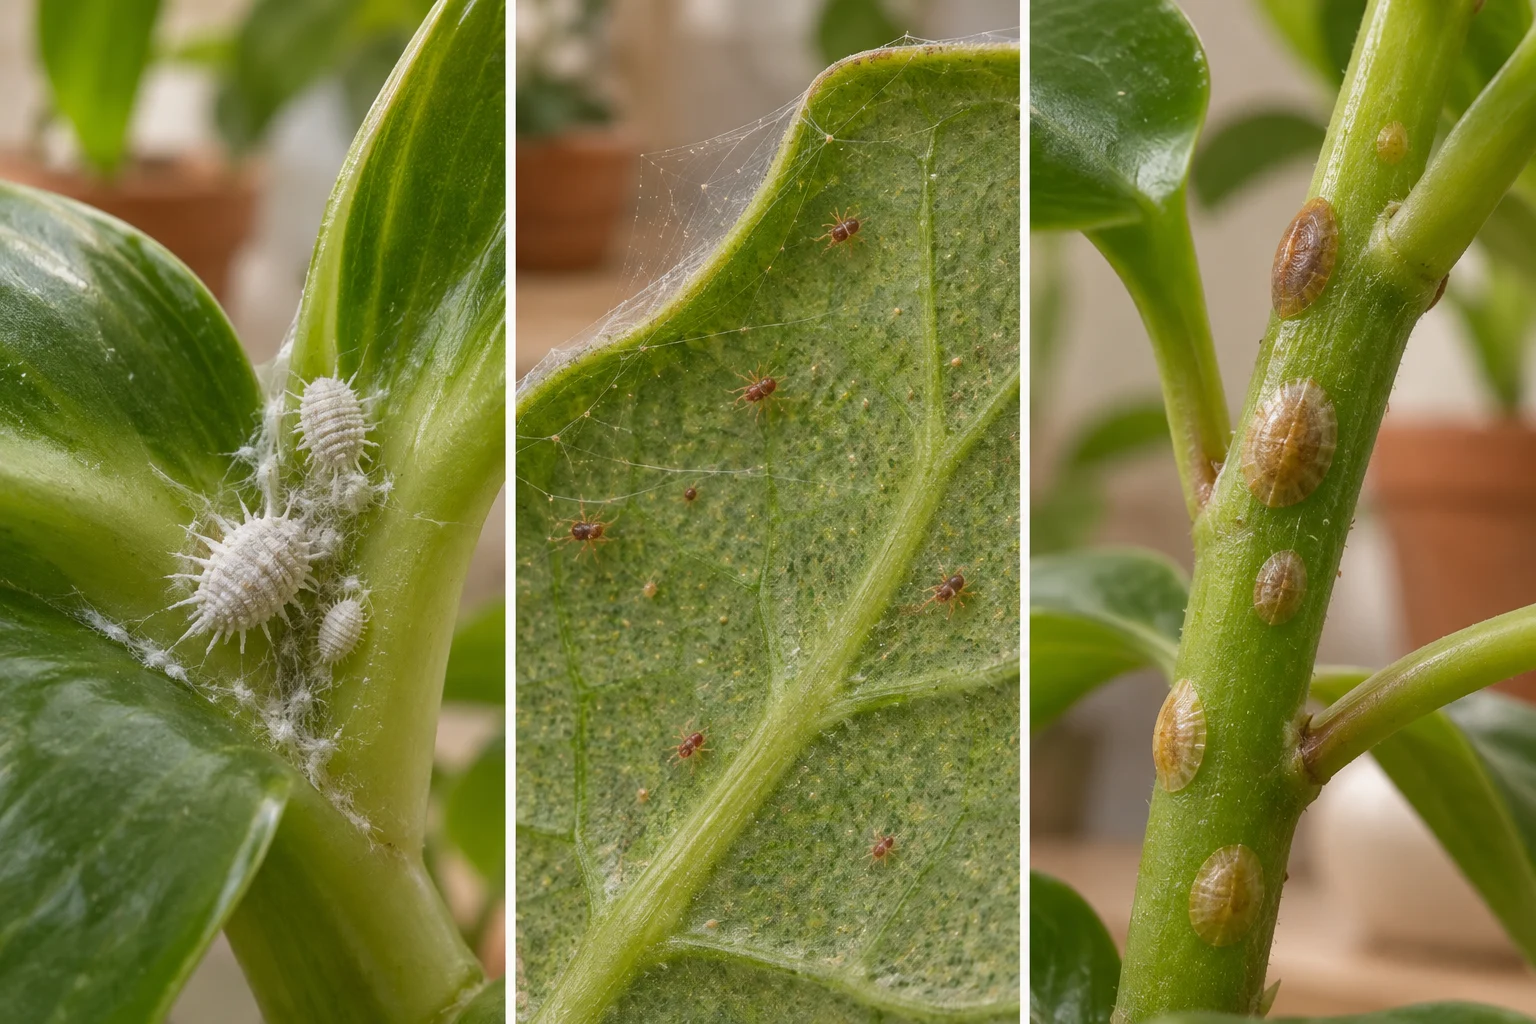
Panels, from left to right
- Mealybugs
- Spider mites
- Scale insects
Read symptoms alongside the root system
Yellowing has several explanations. One aging bottom leaf is different from several leaves yellowing rapidly after the pot has stayed wet. Check the distribution, timing, root firmness and recent environmental changes before acting. A yellow area will not turn green again merely because fertilizer is added.
Wrinkled or drooping leaves can mean too little available water, either because the medium is too dry or because roots are damaged. Inspect before watering again. Brown dry patches may follow sun exposure or physical damage; expanding soft patches are a different problem and warrant isolation. Record whether a patch is enlarging with dated photos.
Poor growth or a failure to rebloom can reflect low light, root problems or a plant still rebuilding strength. Correct one likely cause at a time. A sudden bud drop can follow a move, temperature change, dehydration or pests. Check the remaining buds and root system, and avoid responding with heavy feeding or repeated repotting.
[1][3]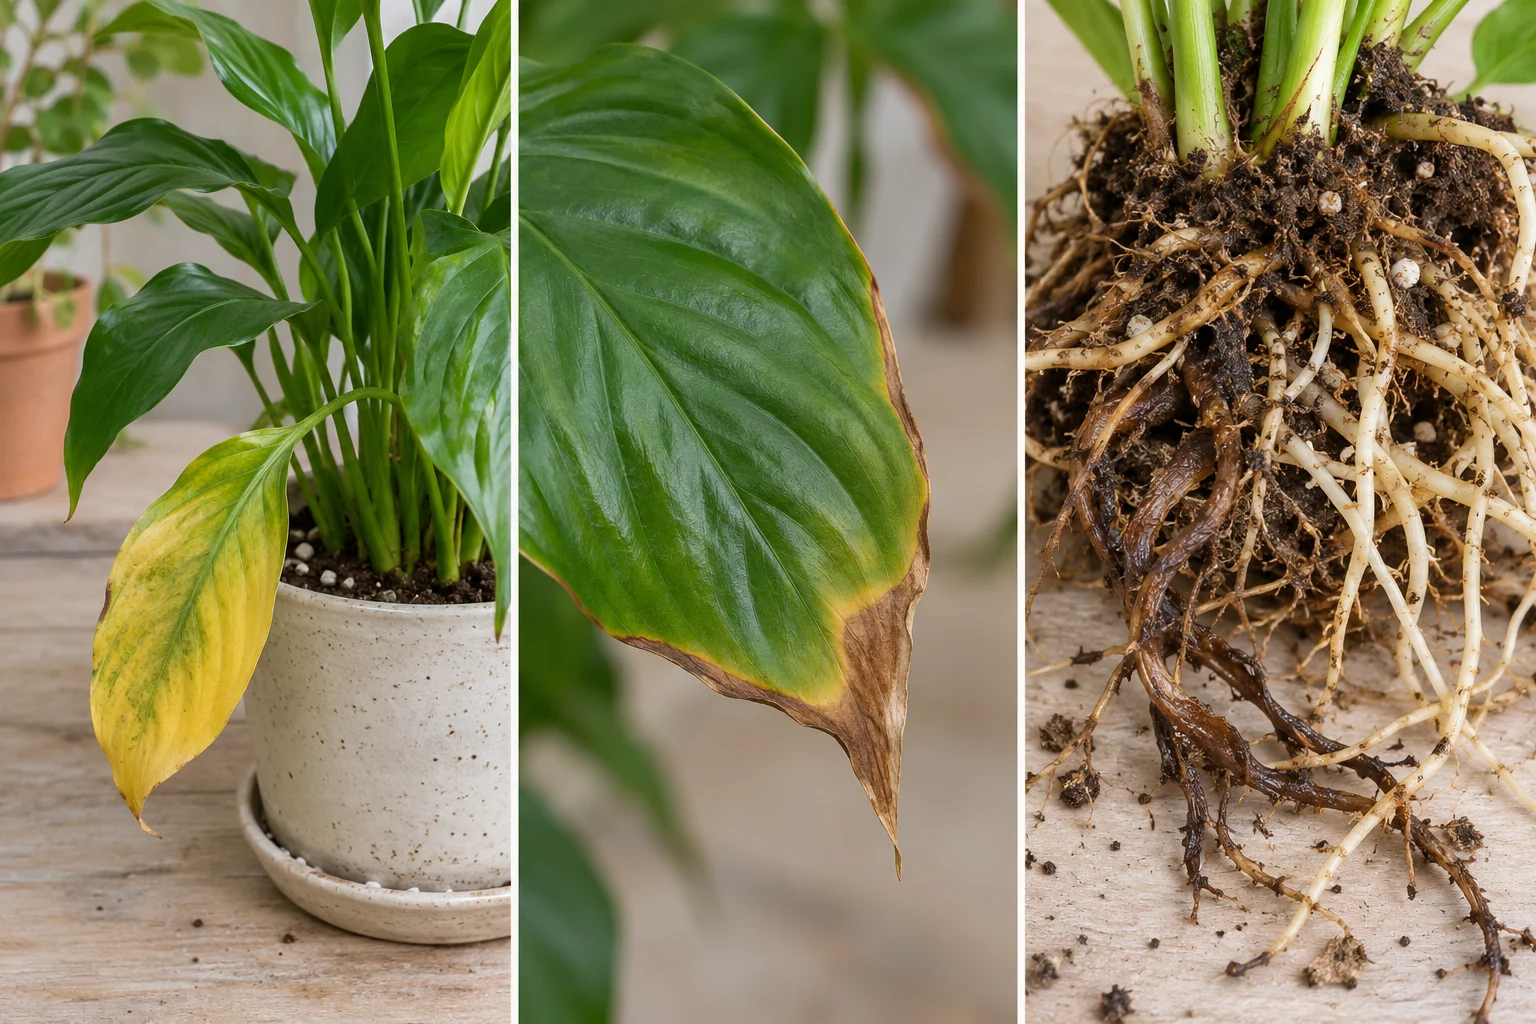
Panels, from left to right
- Yellowing foliage
- Brown leaf edges
- Damaged roots
Wrinkled leaves
- Possible causes
- Dry medium or roots that cannot supply enough water.
- What to check
- Compare pot moisture with root firmness and recent watering.
- Next step
- Water a dry healthy root system; investigate wet deteriorating roots before adding more water.
Yellowing leaves
- Possible causes
- Natural lower-leaf aging, root stress, light stress or other problems.
- What to check
- Note how many leaves are affected and whether the change is rapid.
- Next step
- Correct the likely cause; isolate rapidly declining plants and seek advice if the crown softens.
Bud drop or no flowers
- Possible causes
- Environmental change, insufficient light, root stress or pests.
- What to check
- Review recent moves, temperature, moisture and visible pests.
- Next step
- Stabilize conditions and support healthy growth; avoid repeated repotting or heavy feeding.
Adjust to your room through the year
In spring and summer, stronger light and warmer conditions may increase water use. Check for hot sun through glass and review drying after opening windows or switching on fans. Active root growth can be a useful time for routine repotting if the medium needs replacement.
In autumn and winter, shorter days may reduce growth while indoor heating dries the air. These effects can pull watering needs in different directions. Check the medium instead of automatically halving or doubling a schedule. Protect the plant during transport and keep leaves from touching cold windows.
These seasons describe a common temperate indoor pattern, not a calendar rule for every country. In tropical homes, rainy and dry seasons or air-conditioning may matter more. In the Southern Hemisphere, seasonal timing is reversed. Base reminders on the conditions where the plant actually lives.
[1]After the flowers fade and before the next spike
Moth orchid flowers can remain attractive for many weeks, sometimes months, depending on the hybrid and conditions. Finished flowers eventually fall naturally. Keep caring for the leaves and roots afterwards; discarding the plant or withholding all water is unnecessary.
Adequate light and a healthy root system are the foundation for another flowering cycle. A modest difference between daytime and nighttime temperatures can help many common hybrids initiate spikes, but deliberate chilling is risky. Avoid taking an indoor plant below its suitable range or exposing it to cold draughts in pursuit of flowers.
Some hybrids branch from a green old spike; others produce a new one. Choose whether to retain a healthy green spike based on plant strength and appearance. Seed capsules require pollination and are not a shortcut to easy home propagation. Flower colour or a dyed retail display does not reliably identify the underlying hybrid.
[1][5]Pet safety and sensible handling
Clemson Extension lists Phalaenopsis species as non-toxic to cats and dogs. That classification applies to the orchid, not to pesticides, fertilizers, decorative materials or every other plant sold as an orchid. It does not make the plant a food item or establish that eating it is appropriate for children.
Keep loose bark, clips, stakes and chemicals away from children and animals. Chewing plant material can still cause an upset stomach or other problems even when a plant is classed as non-toxic. If a person or pet has symptoms after an exposure, contact the appropriate poison service, clinician or veterinarian and provide the plant label and any product details.
Wash hands after handling potting medium and use clean tools. Wear gloves if your skin is sensitive or if you are working with a treatment whose label requires them. Do not use ornamental flowers for food or home remedies on the basis of this pet-safety classification.
[4]Grow lights and alternative growing systems
For a plant that repeatedly fails to flower in an otherwise suitable room, supplemental light is a more useful experiment than repeated fertilizer changes. Adjust the lamp gradually, use a timer and record new leaf and root growth. A phone photograph can track changes, but it is not a calibrated light measurement.
Mounted culture and semi-hydroponic systems change how moisture and air reach the roots. They require their own watering, nutrient and sanitation routines and can be less forgiving when a plant is transferred from its existing medium. This guide does not provide a validated conversion recipe for every hybrid. A stable orchid in bark does not need to be converted simply because an alternative is fashionable.
Moss poles are not required: a moth orchid is not a climbing vine. A flower stake is only mechanical support. For a named species, valuable specimen or repeated unexplained decline, seek specialist advice with the full label, medium, water source and a record of conditions.
[1][2]Choosing a hybrid or named species
Miniature, standard, large-flowered and branching hybrids are retail descriptions, not one consistent set of botanical varieties. Choose a healthy root system and intact crown before choosing a flower colour. Miniature plants in very small pots can dry differently from larger plants, even when their general care is similar.
Named species within Phalaenopsis may have different flowering habits or environmental preferences. Preserve the nursery label, including a cultivar or hybrid name when provided. Do not assume that an unlabelled purple or white flower belongs to a particular species.
For a first plant, a healthy common hybrid with clear care information is practical. Check that the decorative outer container can be emptied easily and that you can inspect the growing pot. The best plant for a space is one whose size and moisture routine you can accommodate consistently.
[2][1]Frequently asked questions
How often should I water a moth orchid?
Check the medium and pot weight first. Water as the medium approaches dryness, then drain completely. Moss, bark, pot size and room conditions make a universal weekly schedule unreliable.
[1]Are roots growing outside the pot a problem?
Usually not. Aerial roots are normal for an epiphytic orchid. Keep firm healthy roots; do not cut them off simply because they extend beyond the pot.
[1]Can I use ordinary houseplant soil?
An airy orchid medium is more suitable for common Phalaenopsis hybrids. Dense ordinary potting soil can restrict air around the roots and remain wet too long.
[1]Must the pot be transparent?
No. A clear pot makes roots and moisture easier to observe, but drainage and suitable pot size matter more than transparency.
[1][6]Should I cut the spike after flowering?
Remove a fully dry brown spike. A healthy green spike can be retained because some hybrids flower again from it, or removed when a weak plant needs to recover. Keep the central leafy stem intact.
[1]Does a yellow bottom leaf mean the plant is dying?
One old lower leaf can yellow naturally. Rapid yellowing of several leaves, soft roots or a declining crown needs investigation. The pattern and speed matter more than the colour alone.
[1]Can I grow it in a room without daylight?
A suitable grow light can provide light, but the fixture must be positioned and timed appropriately. A dark room without either daylight or a grow light cannot support healthy long-term growth.
[1][6]Is misting enough to water an orchid?
No. Roots in the medium still need appropriate watering. Misting gives only a temporary humidity change and can leave water trapped in the crown or leaf joints.
[1]How do I recognise a keiki?
A keiki is a small plantlet with leaves and eventually its own roots, often on a flower spike. It differs from a flower bud or a single new root. Wait for adequate development before separation.
[1]Is this orchid safe around cats and dogs?
Clemson Extension classifies Phalaenopsis as non-toxic to cats and dogs. Keep it out of chewing reach anyway, and remember that treatments, potting materials and stakes have separate risks.
[4]Why did unopened buds fall off?
A change in temperature, water availability, location or pest pressure can contribute. Check conditions and inspect closely; bud drop alone does not identify one cause.
[1][3]Can I put ice directly on the roots?
This guide uses room-temperature water applied thoroughly and drained away. That method lets you assess moisture and avoids direct cold contact with tropical roots; do not substitute a fixed ice-cube count for a moisture check.
[1]Do white deposits prove there are mealybugs?
No. Mineral residue and other material can look pale. Mealybugs need close inspection, especially around joints and flower spikes. Isolate a suspect plant before treatment and confirm the pest.
[3]Will fertilizer repair damaged leaves?
Existing scorch or dead tissue will not become healthy again. Correct the cause and judge improvement by stable damage and healthy new growth, rather than feeding heavily to recolour an old leaf.
[1]Compare related plants
- Thanksgiving cactus: Another plant with epiphytic ancestry, but its segmented stems and flowering triggers call for a different routine. Do not copy its seasonal rest instructions onto a moth orchid.
- Peace lily: Both are grown for showy flowers indoors, but peace lily grows in a more moisture-retentive terrestrial mix. An orchid’s exposed roots and airy medium need a different watering check.
Care reminders with PlantPal
Add your moth orchid to PlantPal and use care reminders as a prompt to check the medium, inspect roots and review growth. Adjust the routine when you repot or move the plant.
Add a plant-care reminder